Add your own logic to the FPGA
This needs Vivado 2022.2 (in a container on any Linux) and a previous full factory build.
-
Simulate first. Synthesis tells you the logic fits, not that it is right:
# run from: firmware/
./sim/run_sim.sh            # ad_fs4_ddc: 473 checks; tx_gpio_bitmap: 2092 checks
./sim/run_sim.sh --mutate   # breaks the modules ten ways; every mutant must be caught
The key check is gapped valid: in 2R2T mode the AD9361 asserts
validonly every second clock, so a counter must advance once per sample, not per clock. -
Make the change, in
system_bd.tclor the block design (what is safe to change). To edit in the Vivado GUI instead, see below. -
Delete the Vivado project, then rebuild only the FPGA:
# run from: firmware/
rm -rf src/hdl/projects/pluto/pluto.{xpr,cache,gen,hw,ip_user_files,runs,sim,srcs,sdk}
./scripts/build_all.sh --hdl-only     # ~20 min; skips kernel/u-boot/rootfs
Always delete the Vivado project before an HDL or coefficient change
build_hdl.tclreuses an existingpluto.xpr. Asystem_bd.tclor.coeedit is not picked up, and the build quietly produces the old design. -
Check it landed, then flash it with
./devkit flash --target factory --boot-only:# run from: the repo root ./devkit verify --target factory
You should see: the DSP and LUT counts in verify's FPGA section change
the way your design should.
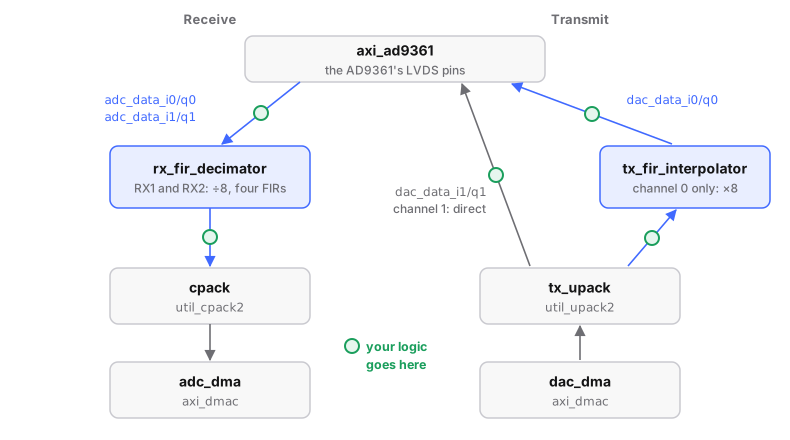
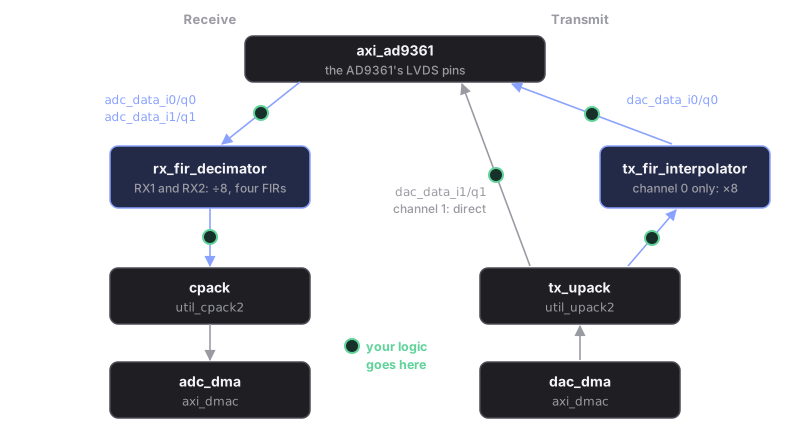
Where a block can go on the default build, which filters both receive
channels (patch 0021). Upstream's wiring, built with STOCK_RX_FILTER=1,
sends receive channel 1 straight to cpack instead
(the design as built).
Editing in the Vivado GUI
The block design exists only after a first full build. Open it:
# run from: firmware/
source ../tools/env-vivado.sh
cd src/hdl/projects/pluto
vivado pluto.xpr
In the GUI: Sources → Design Sources → system_top → system_i, right-click Open Block Design.
After a GUI edit, save the block design (Ctrl-S; unsaved edits are
silently left out), Validate Design (F6) and close Vivado (it holds a project
lock), then run ./scripts/build_all.sh from firmware/. A GUI edit saved
into pluto.xpr is picked up without deleting the project.
Worked examples: an FM channelizer in the FPGA and the sample-locked GPIO outputs. Every block, clock and trap: the stock block design. New to Verilog? Fabric School.